Rip Your Troubles Away
by David Muller
Table Of Contents:
Introduction
Materials
Software
Part 1: The Rip
Part 2: The FlasK
Selecting A File
Setting Formats And Bitrates
Setting Advanced Options
Video
Audio
Post Processing
Files
General
Part 3: The Dub
Settings
Tasks
Dubbing a FlasKed File
Splitting A FlasKed File
Rejoining A Segmented File
Saving A Soundtrack (Audio Tracks)
Saving A Single Frame
Conclusion
Legal
Introduction
DVDs can hold an enormous quantity of data: up to 4.7GB on a single-layer disc or up to 8.5GB on a dual-layer disc. They are a remarkable improvement over both the bulky VHS tape and the ubiquitous CD (which holds only 700MB, or 0.7GB). However, most DVD movies are sold in large boxes which can increase the movieĺs weight by a factor of two or more and its volume by five times or more, virtually eliminating their portability. Even worse, a disc runs the risk of damage each time it is removed from its packaging. These problems can make collecting and enjoying DVDs more trouble than they should be.
Fortunately, there is a solution: ripping. There are a number of methods for videophiles to copy the contents of a DVD onto a computer hard drive and convert them to a more compact, portable format. This article will guide readers through one effective DVD ripping process, covering many important details of the ripping process.
Materials
First you will need to gather these required materials:
- A DVD-ROM drive or better
- A decent computer ľ the CPU speed and hard drive size will make the most difference here.
- DVDs
Software
You will also need to download and install the following programs:
- SmartRipper
- This program streamlines the transfer of a DVDĺs files to your hard drive.
- DivX Codec
- This program will allow your computer to create MPEG4 (also known as AVI, Audio-Video Interleave) format video files.
- Radium MP3 Codec
- This program will allow your computer to use a variety of audio formats, sizes, and qualities.
-
- FlasKMPEG Encoder
-
- This program constitutes the majority of the ripping process.
- VirtualDUB
-
- This program lets you do more with your encoded file, including syncing and splitting.
Before you can start ripping, you need to download and install the required programs and follow any additional instructions they give you. The two codecs listed above need to be installed and functioning before ripping, but do not add any steps to a rip.
Part 1: The Rip
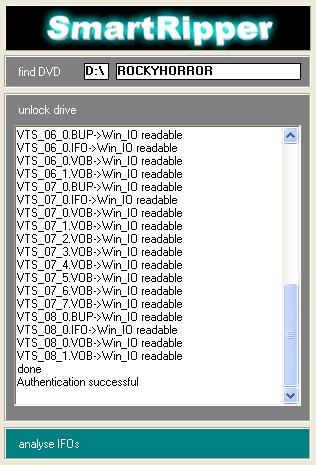
- To rip a DVD (copy it to your hard drive), put it in the DVD-ROM drive and play it for a few seconds with Windows Media Player, PowerDVD, Nero Showtime, or some other such program to unlock it. This will allow SmartRipper full access to the files on the disc.
- Open SmartRipper. You should see a small window pop up describing SmartRipperĺs attempts to read the DVD.
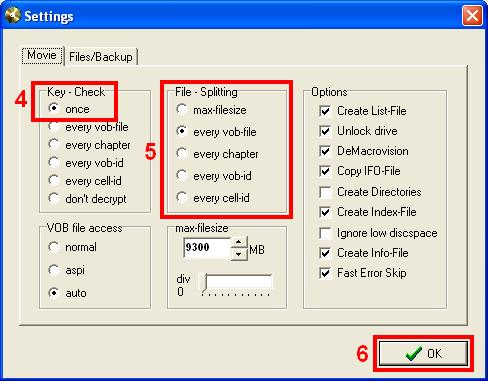
- Click the Settings tab to adjust your preferences.
- Set the Key-Check to ôOnce.ö
- Choose a file splitting mode:
- max-filesize
- This setting is for older computers.
- every vob-file
- This is the default, ordinary mode.
- every chapter
- This setting will create a separate file for every chapter. This can be important when you want to split a VTS (video title sequence) file into parts. For example, a television show might have two VTS files per disc and three or four episodes per VTS. In this case, you would select this mode and choose only the chapters of the episode you want, keeping each episodeĺs group of ripped chapters separate to be able to process them individually later.
- every vob-id
- You wonĺt need this setting.
- every cell-id
- You wonĺt need this setting.
- Click "OK."
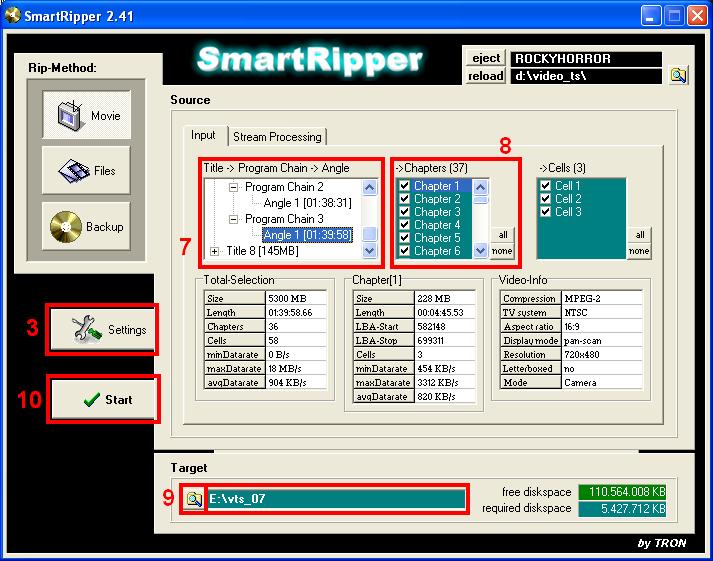
- Choose the video you want to rip in the ôTitle->Program Chain->Angleö field.
- Choose the chapters you want to rip in the ô->Chaptersö field.
- Browse to the location where the ripped files will be.
- Click ôStart.ö
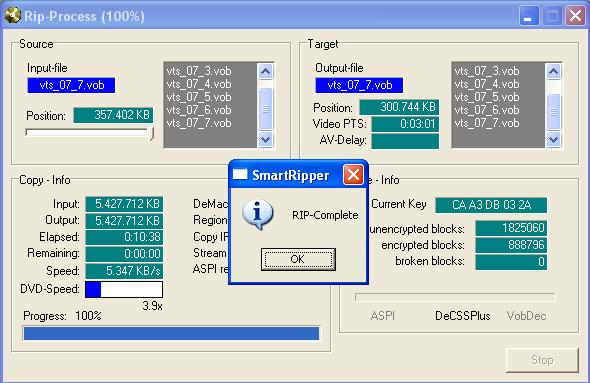
- A television episode 22 minutes long will take between one and three minutes to rip, and a full-length movie can take 15 minutes or more. SmartRipper will notify you when it finishes a rip.
Part 2: The FlasK
Run FlasKMPEG.
Selecting A File
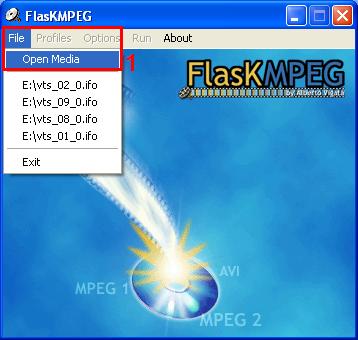
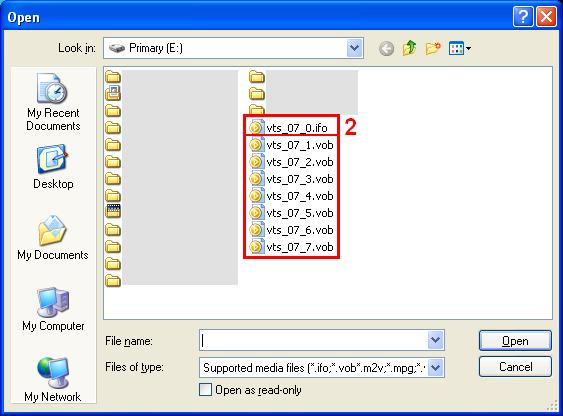
- Select File -> Open Media.
- If the video you want to encode was contained in a single ôTitle,ö double-click to choose a file that ends in ô.ifo.ö If you didnĺt rip an entire ôTitleö (perhaps because a ôTitleö contained several episodes of a television show), choose a file that ends in ô.vob.ö When you choose a .vob file, FlasKMPEG will also include all .vob files connected to the one you chose.
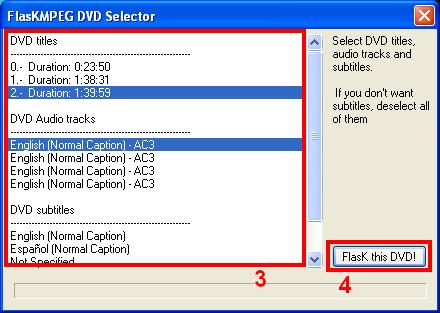
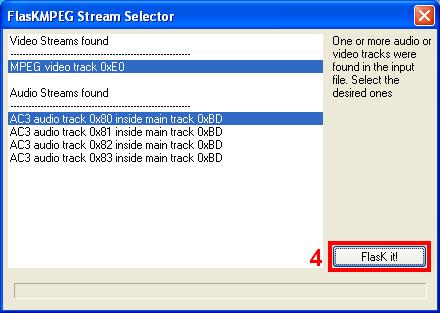
- Choose what audio or subtitle streams you want to include by clicking on them. To deselect a selected subtitle stream, simply click on it again.
- Select ôFlasK this DVD!ö
Setting Formats And Bitrates
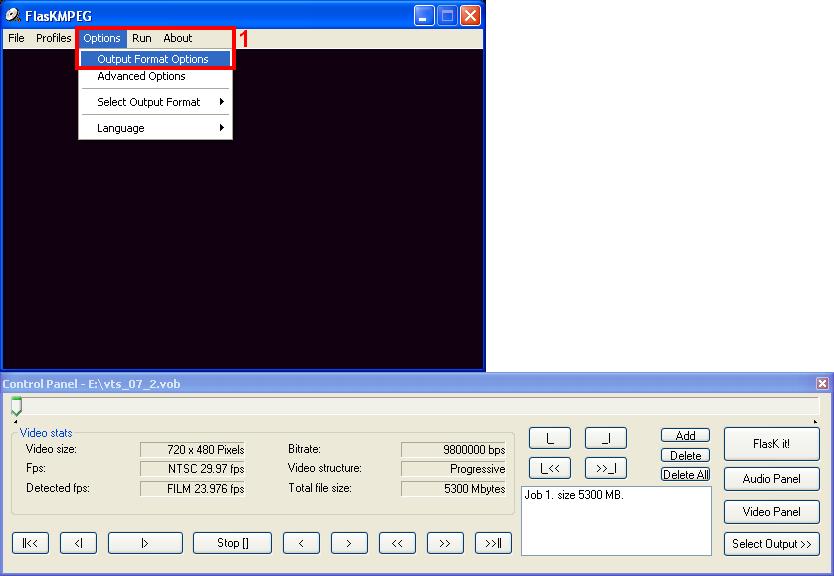
- Select ôOptions-> Output Format Options.ö
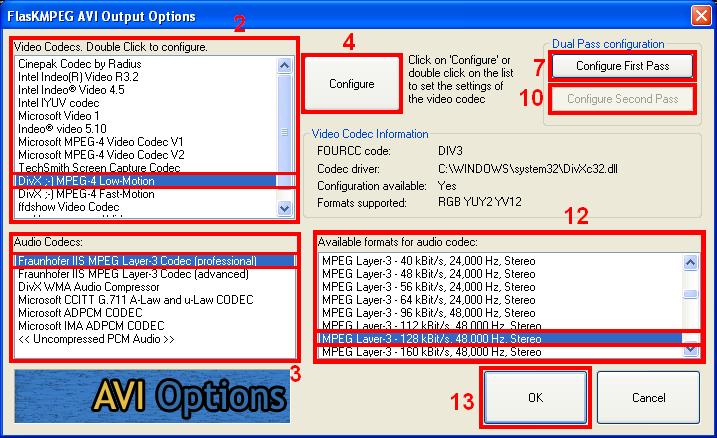
- Under ôVideo Codes: Double Click to configure,ö select ôDivX ;-) MPEG-4 Low-Motion.ö
- Under ôAudio Codecs,ö select ôFraunhofer IIS MPEG Layer-3 Codec (professional).ö
- Click ôConfigure.ö
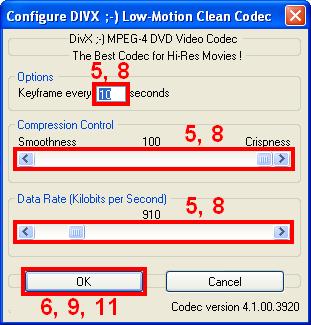
- Enter ô10ö (without the quotes) for the first field, ô100ö for the first slider, and ô6000ö for the second slider.
- Click ôOK.ö
- Click ôConfigure First Pass.ö
- Use the same settings as in Step 5.
- Click ôOK.ö
- Click ôConfigure Second Passö and check that the settings are the same as in ôConfigure First Pass.ö
- Click "OK."
- Under ôAvailable formats for audio codec,ö choose any option that mentions ôStereoö and ô48,000 Hz.ö This will give you stereo sound that syncs properly with the video. Youĺll get excellent sound with a bitrate of ô128 kBit/s,ö but you can choose a lower or higher bitrate for less space or better quality, respectively.
- Click ôOK.ö
Setting Advanced Options

- Select "Options-> Advanced Options."
- Click ôOKö or ôCancelö at any time to accept any changes youĺve made and close the dialog box or discard any changes youĺve made and close the dialog box, respectively.
Video
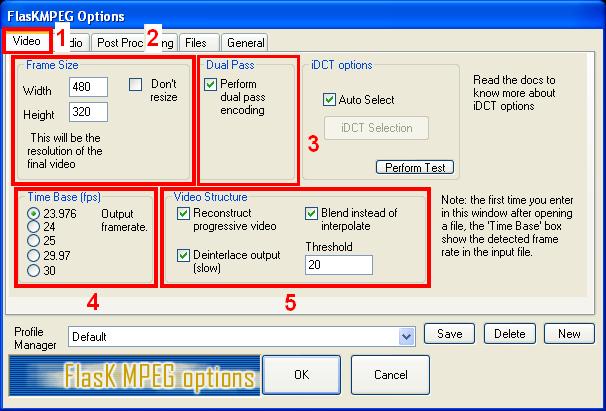
- Click on the "Video" tab.
- In ôFrame Size,ö uncheck ôDon't resize,ö make the ôWidthö ô480,ö and make the height ô320.ö The reasons for this will be discussed below.
-
In ôDual Pass,ö check ôPerform dual pass encoding.ö While this will take FlasKMPEG twice as long to encode, it will yield much better results. The way it does this is as follows:
- FlasKMPEG analyzes the video and stores data about when to devote a higher bitrate to fast-motion parts and a lower bitrate to lower-motion parts in a temporary log file.
- FlasKMPEG encodes the video with information from the log file it created.
- The result is a video that can look good everywhere without sacrificing too much disk space.
However, if you encode the video at its original, full resolution of 720x480, Dual Pass will make a mess of the job. It will be forced to devote an extremely high bitrate to fast-motion parts and a woefully inadequate bitrate to lower-motion parts. This will cause an amazing amount of artifacts (which are bad) to appear all the time in your video. If you choose a resolution of 480x320, though, FlasKMPEG will be able to create a video that looks excellent at all times and will usually take up a lot less space than a video created using Single Pass (which encodes all parts at the bitrate you select, which is wasteful during low-motion parts).
- The ôTime Base (fps) section is the frames per second of the encoded video. FlasKMPEG will automatically detect the correct framerate.
- In the ôVideo Structureö section, try starting with all three checkboxes checked. If the entire video ends up looking wavy, choppy, or otherwise unacceptable, try changing these options. Youĺll have to experiment a bit to see what works best with each DVD.
Audio
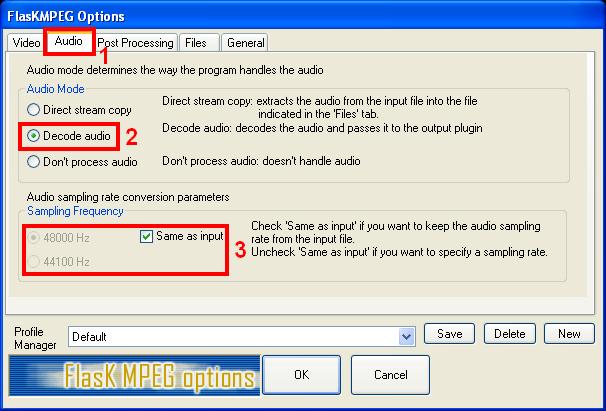
- Click on the ôAudioö tab.
- Select ôDecode audio.ö
- Uncheck ôSame as input,ö select ô48000 Hz,ö and recheck ôSame as input.ö This will ensure that the audio sampling rate is the proper 48000 Hz.
Post Processing
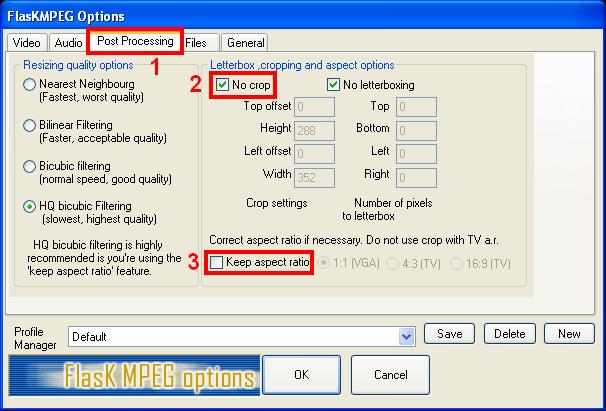
- Click on the ôPost Processingö tab.
- Make sure that ôNo cropö is selected.
- Make sure that ôKeep aspect ratioö is not selected.
Files
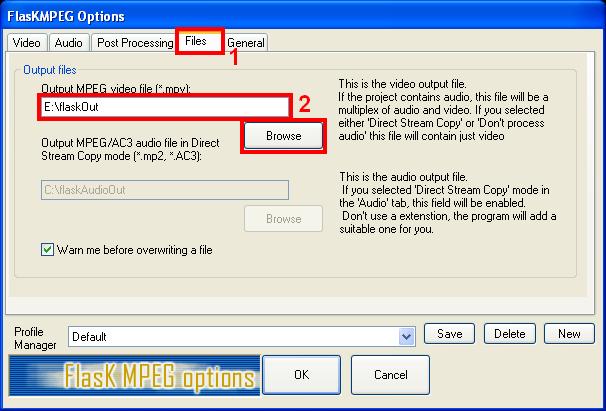
- Click on the ôFilesö tab.
- Click on the ôBrowseö button to choose a location and a name for FlasKMPEGĺs output file, or enter them into the text box. The filename does not need to end with ô.avi,ö as FlasKMPEG will add that automatically.
General
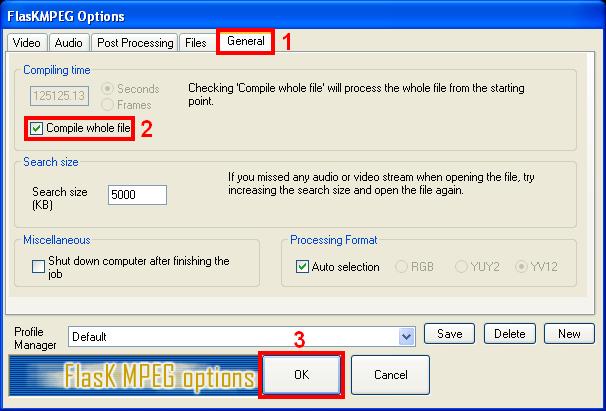
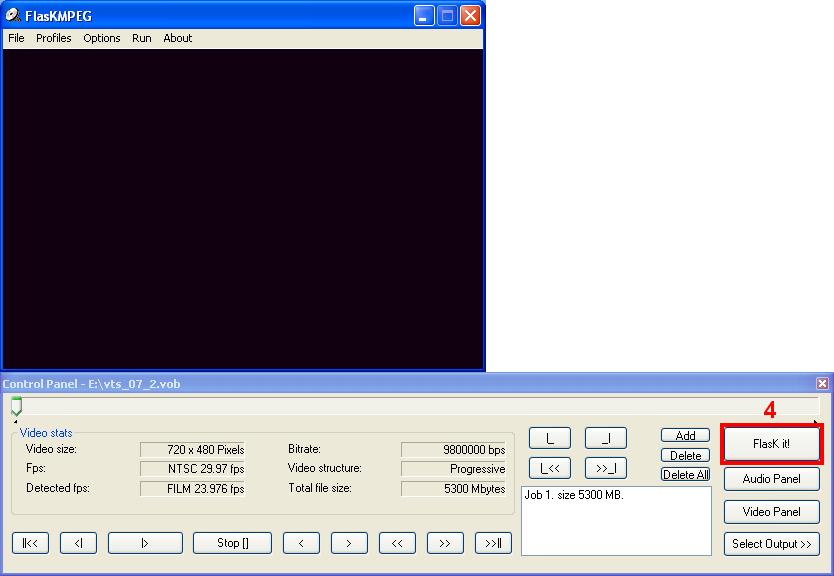
- Click on the ôGeneralö tab.
- Make sure that ôCompile whole fileö is selected.
- Since youĺve gone through all of the options in this dialog box, you can click ôOKö at this point to accept the changes youĺve just made.
- Click ôFlasK it!ö
Part 3: The Dub

- Run VirtualDub.
- To open a file, select ôFile-> Open Video Fileö or press ôCtrl+O.ö
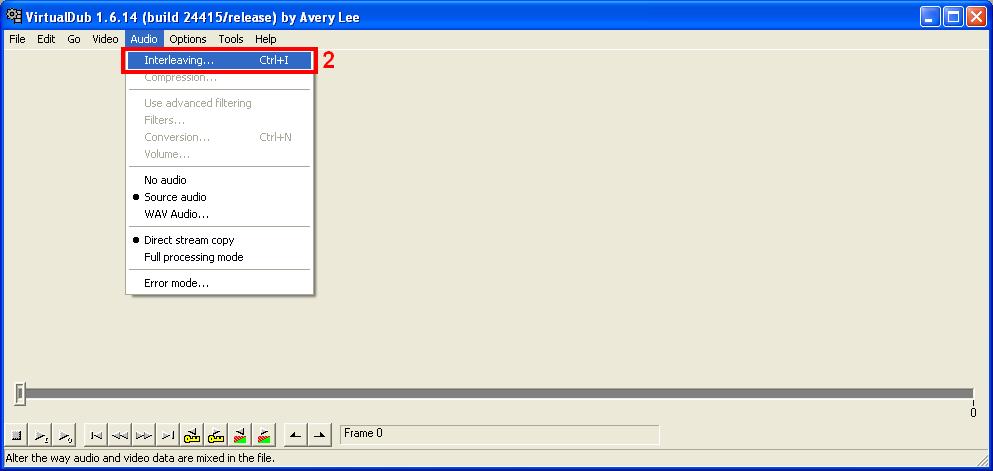
Settings
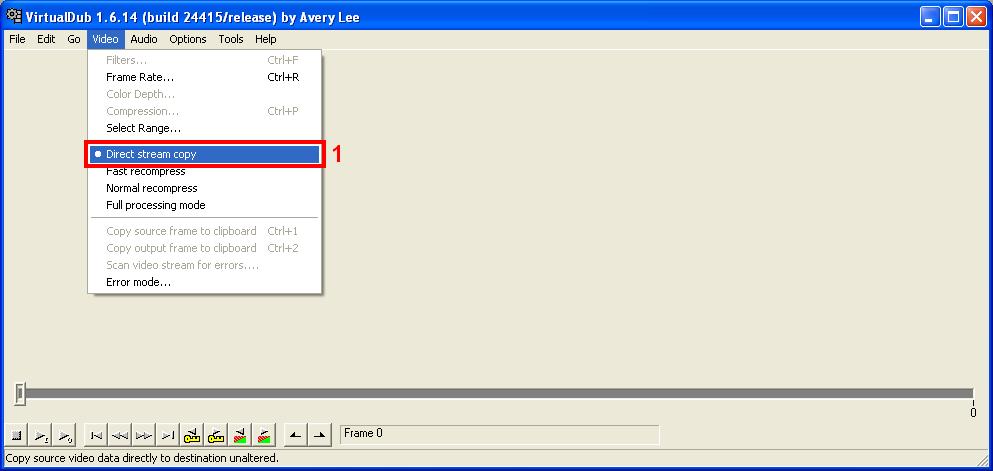
- Select ôVideo-> Direct stream copy.ö
- Select ôAudio-> Interleaving.ö
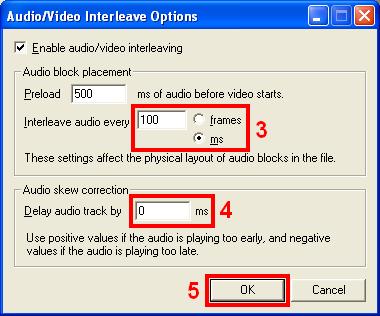
- Set the ôInterleave audio everyö field to ô100ö and select ômsö after it.
- The ôAudio skew correctionö section is sometimes necessary if the video and audio in a clip are not correctly synced. If something happens in a clip and you hear it a fraction of a second later, make the ôDelay audio track byö value negative. This happens more often than the opposite, in which case you would use a positive value.
- Click "OK."
Tasks
Dubbing A FlasKed File
- Follow the steps above.
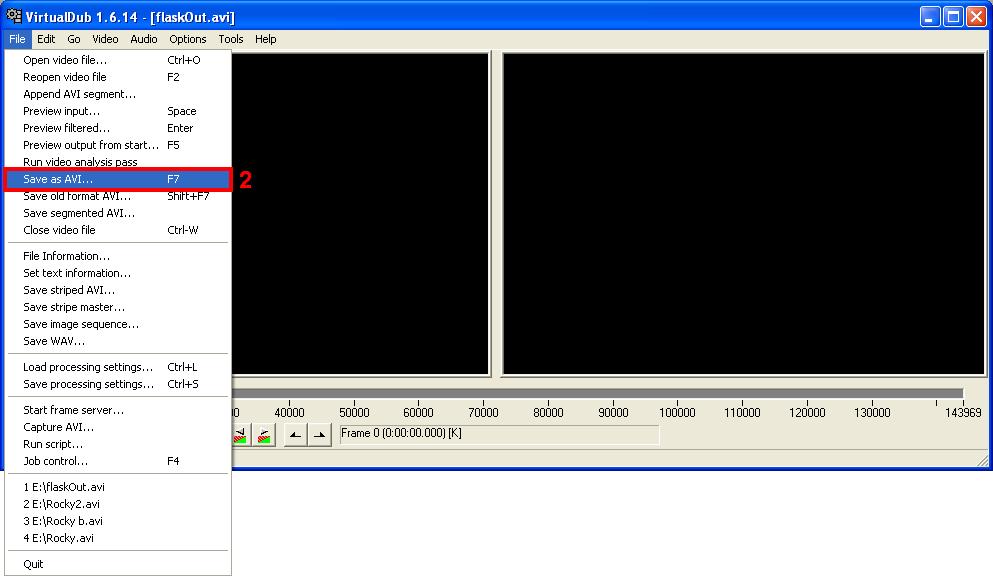
- Select ôFile-> Save as AVI.ö
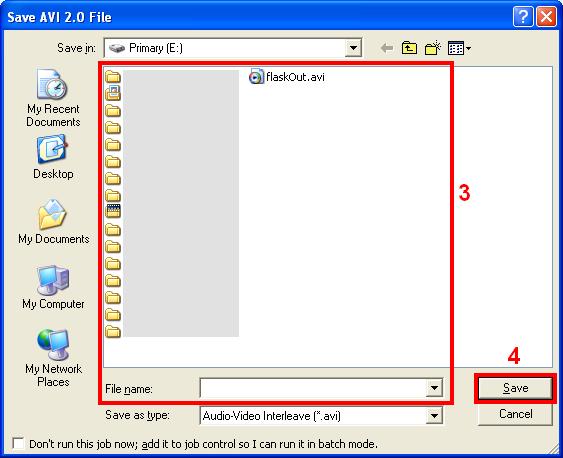
- Browse to a location and choose a filename.
- Press ôEnterö or click "Save."
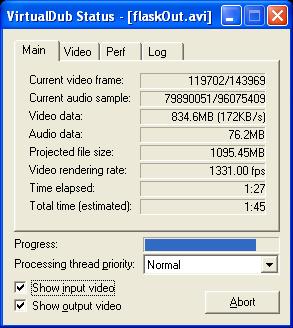
- The process should take between three and five minutes, depending on the filesize.
Splitting A FlasKed File
You might want to split a file into parts for several reasons, including:
- To fit a large video onto several CDs
- To save a small video segment of particular interest
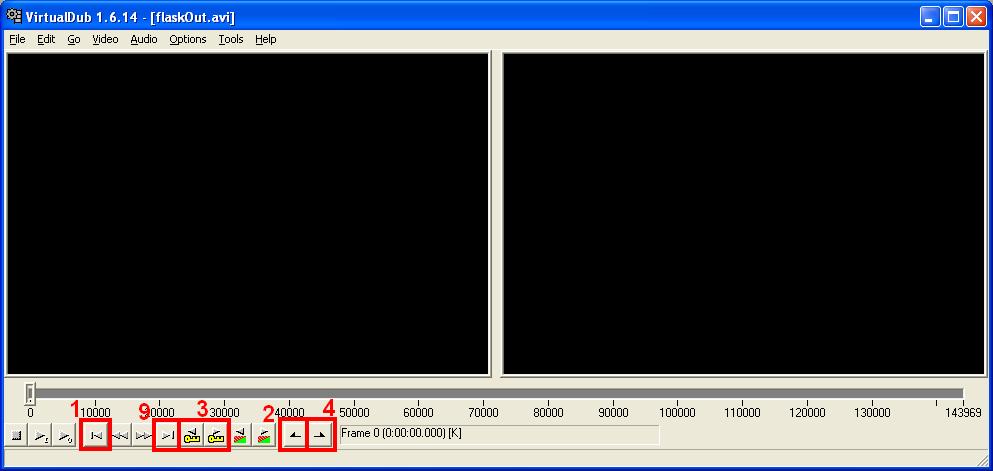
- Set the slider at the beginning of the file by selecting ôGo-> Beginning,ö pressing ôCtrl+Left,ö or pressing ô[Start].ö
- Mark the beginning of a desired video segment by selecting ôEdit-> Set selection start,ö pressing ôHome,ö or clicking ô[Mark in].ö
- Click and drag the slider to the endpoint of the desired video segment. Hold ôShiftö while you drag to snap the slider between keyframes. Select ôGo-> Prev keyframe,ö press ôShift+Left,ö or click ô[Key previous]ö to snap to the closest keyframe before the slider position. Select ôGo-> Next keyframe,ö press ôShift+Left,ö or click ô[Key next]ö to snap to the closest keyframe after the slider position.
- About Keyframes
- Keyframes are inserted regularly into a video file when it is encoded. If you follow the above directions, keeping the default settings, FlasKMPEG will insert a keyframe into a video file every ten seconds. A video segment must start at a keyframe, but doesnĺt necessarily have to end in one. If you are splitting a video into parts, each section will have to begin and end in a keyframe so that the following section can begin in one. The segment containing the end of the video does not have to end in a keyframe and the slider can be set to the last frame in the video. Try to use keyframes that occur in parts of the video with little or no action or dialogue for a more seamless experience.
- Mark the end of a desired video segment by selecting ôEdit-> Set selection end,ö pressing ôEnd,ö or clicking ô[Mark out].ö
- Follow steps 2-5 in Dubbing A FlasKed File, above, to save the current segment. Remember that each segment needs a unique filename.
- Keeping the slider at the end of the previous segment, follow step 2 above.
- After the beginning of the segment has been marked, follow steps 3-5 above.
- Repeat steps 2-5 above to save the remaining segments.
- For the last segment, follow step 6 above and then select ôGo-> End,ö press ôCtrl+Right,ö or click ô[End]ö to make the last segment end at the end of the original video.
- Follow step 5 above (steps 2-5 in Dubbing A FlasKed File) to save the last segment.
Rejoining A Segmented File
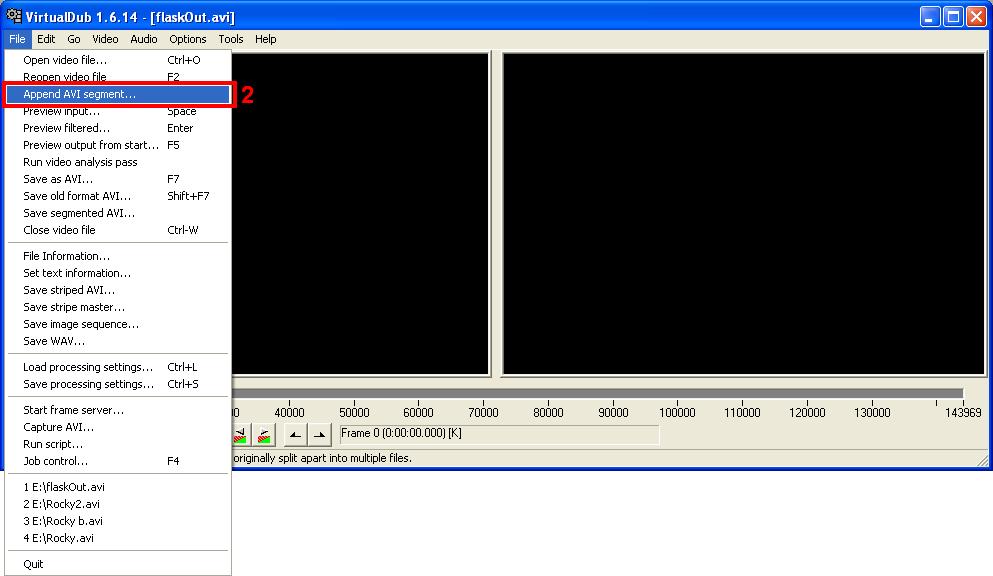
- Open the first segment of the segmented video file by selecting ôFile-> Open Video Fileö or pressing ôCtrl+O.ö
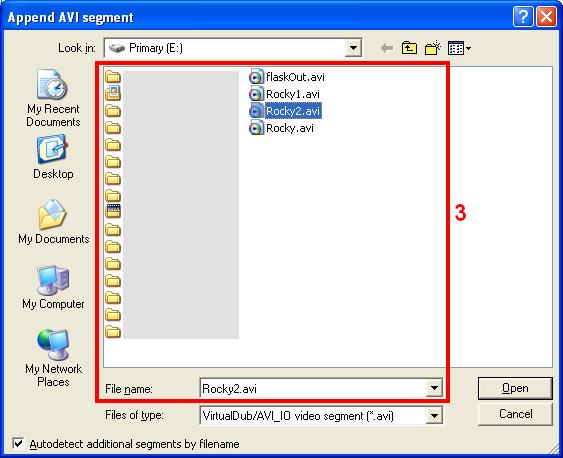
- Attach the second segment by selecting ôFile-> Append AVI segment.ö
- Browse to the next segment, and double-click it.
- VirtualDub will automatically append any appropriate files until the video is complete, but only if they are all in the same folder. If you stored each segment in a separate folder, follow step 2 above for each segment.
- Follow steps 2-5 in Dubbing A FlasKed File, above, to save the completed video.
Saving A Soundtrack (Audio Tracks)

- Navigate to the beginning of an audio track by using the slider or the buttons at the bottom of VirtualDubĺs control panel.
- Mark the beginning of a desired audio track by selecting ôEdit-> Set selection start,ö pressing ôHome,ö or clicking ô[Mark in].ö
- Navigate to the end of an audio track by using the slider or the buttons at the bottom of VirtualDubĺs control panel.
- Mark the end of a desired audio track by selecting ôEdit-> Set selection end,ö pressing ôEnd,ö or clicking ô[Mark out].ö
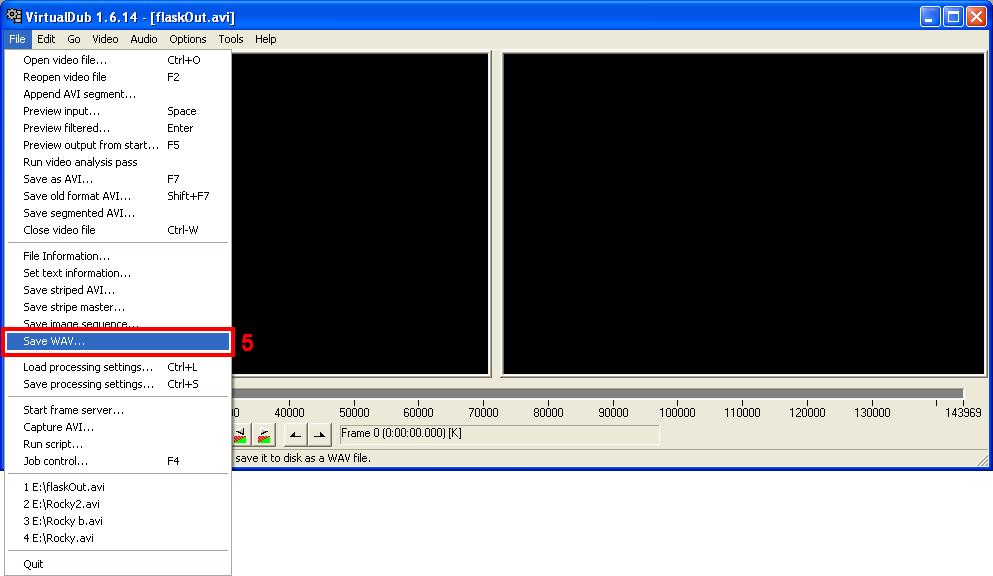
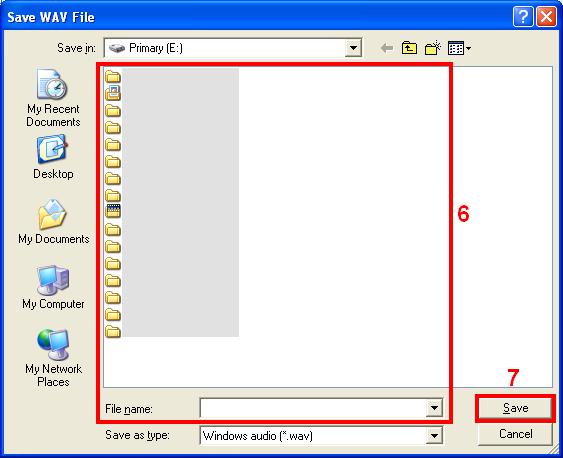
- Select ôFile-> Save WAV.ö
- Browse to a location and choose a unique filename.
- Click ôSave.ö
- Repeat steps 1-7 above for each desired audio track.
Saving A Single Frame
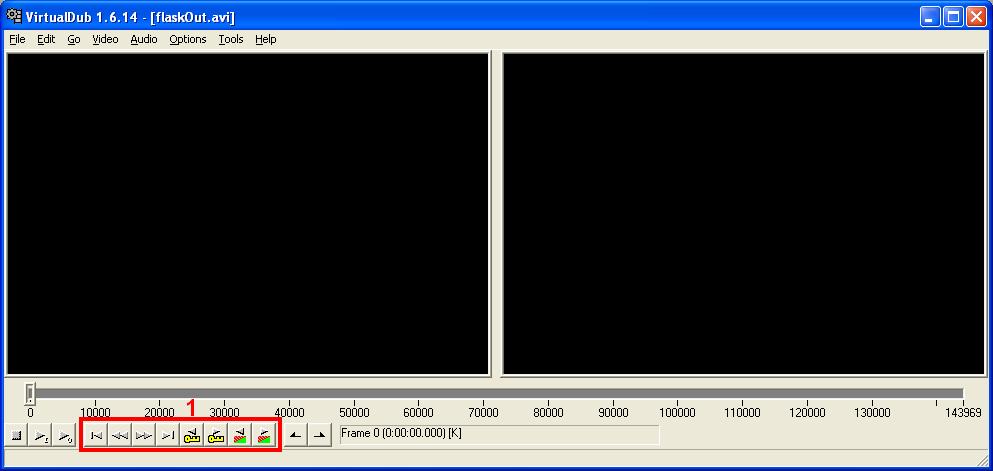
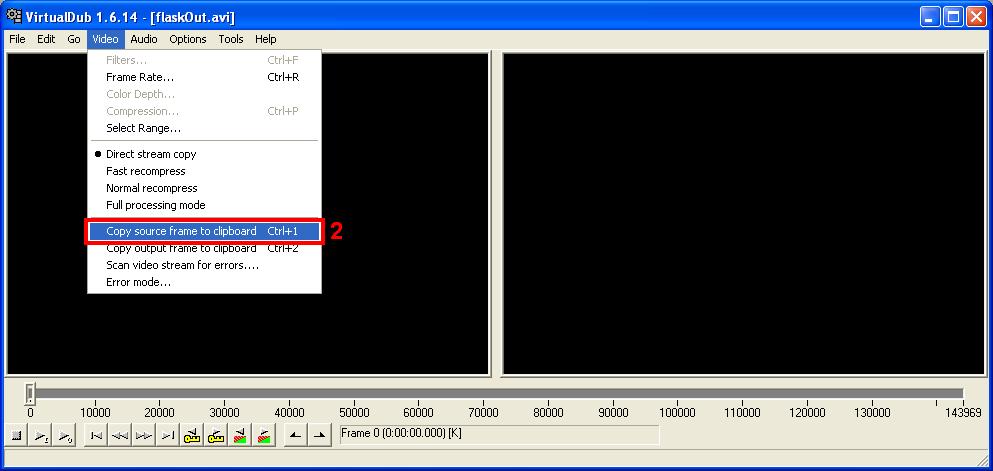
- Navigate to the desired frame by using the slider or the buttons at the bottom of VirtualDubĺs control panel.
- Select ôVideo-> Copy source frame to clipboardö or press ôCtrl+1.ö
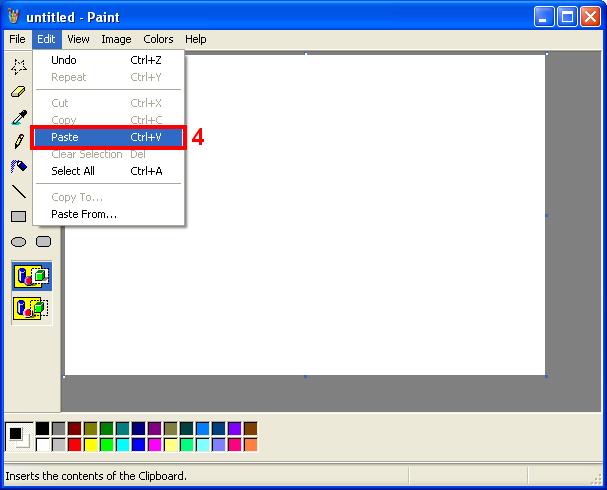
- Open a program such as Windows Paint (located in ôStart-> All Programs-> Accessories-> Paintö in Windows XP).
- Select ôEdit-> Pasteö or press ôCtrl+V.ö
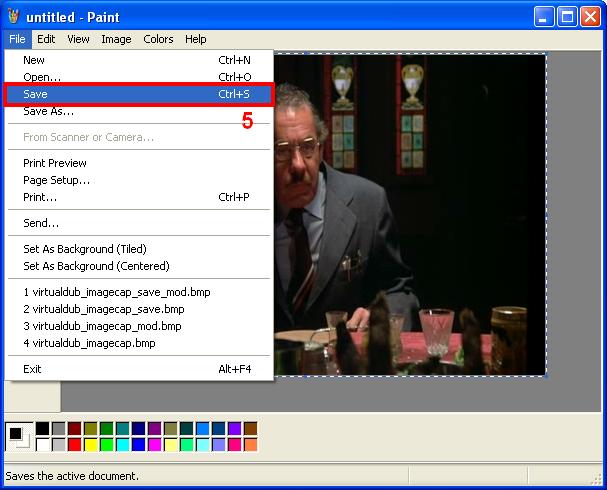
- Select ôFile-> Saveö or press ôCtrl+S.ö
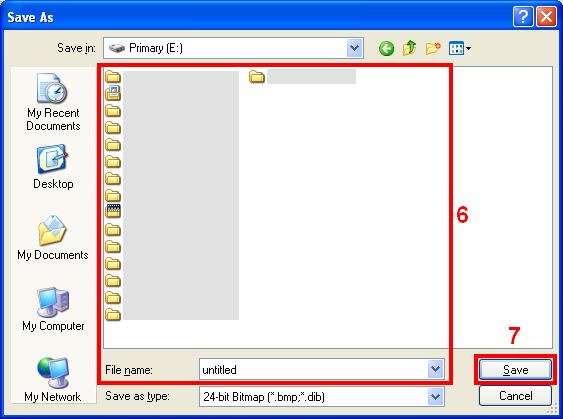
- Browse to a location and choose a unique filename.
- Click ôSave.ö
Conclusion
You now have complete control over the DVDs cluttering the space around you, whether theyĺre on shelves, racks, or in stacks on the floor. You can watch DVDs when itĺs convenient for you. You can bring every episode of your favorite television shows wherever you go. You can listen to snippets of your favorite movies or shows on a portable audio player. You can even send your friends a snapshot of a favorite scene. And, perhaps most importantly for the couch potato in all of us, you are no longer forced to reach for a shelf, perhaps all the way across a large room, simply to watch your movies.
Legal
This guide is purely informational.
This guide, including its contents, screenshots, and design, was created by David Muller and is copyright David Muller 2006. However, David Muller assumes no responsibility for anything anyone does for any reason, nor for any event that occurs for any reason. David Muller neither encourages nor condones anything of any sort.
Contact